

How To Install Bass Shakers In Car
Striving for realistic immersion is every home theater enthusiast'south end game, and if you're like me, you'll go to extremes to find it. Modernistic technologies allow for exacting room optimization, a dynamic large screen video system, dazzling immersive sound, and bass that can pop nails in drywall – all of which are essential pieces to the puzzle. Just a fun side to the hobby is finding a unique add-on that heightens a particular dimension of the overall home theater feel, especially if it can exist done on the cheap. For my money, going the do-it-yourself route and installing a bass shaker organization more than than fits the pecker.
Before digging into the world of bass shakers (aka tactile transducers), I'm compelled to mention the absolute best way to innovate bone-rattling tactile sensations into your room is through the use of a subwoofer (or, better notwithstanding, subwoofers). Nine times out of x, a properly sized and equalized subwoofer system will become yous where you need to go. Truth be told, my dual subwoofer arrangement delivers more enough power and oomph to send thumps, thuds, and vibrations straight through my theater room's seating. Bass shakers simply enhance the tactile attributes of the lower-end while adding quite a bit of punch that can be felt correct in the seat of your pants – literally. Believe it or not, that kind of direct placement of deep bass power can bring you that much closer to realism. Alternatively, shakers can be used to inject the feel of bass in situations where a subwoofer organization lacks proper power or is being played at lower book levels.
Who Makes Bass Shakers?
There are a number of bass shaker brands on the market, including models made by Reckhorn, Earthquake, Clark Synthesis, Buttkicker, ADX and AuraSound. Buttkicker, Earthquake, and Clark Synthesis all make products that lean toward the more expensive side of the equation; you lot'll typically find models from these manufacturers selling in the $150-$600 dollar range. ADX falls in a price range just beneath the $150 mark, while both Reckhorn and AuraSound offer models that can be found for $65 or less. Here in the The states, Clark Synthesis, Buttkicker, and AuraSound are the most prevalent brands on the market, while our European friends have meliorate admission to the likes of Earthquake and Reckhorn.
Like anything in this globe, the more you lot spend, the more than you'll get. The nearly expensive shaker models evangelize more thump, accept wider usable frequency spectrums, and tin handle more power. The Clark Synthesis Platinum model is i of the well-nigh powerful shakers on the market, offering a functional frequency response range of 5 Hz to 17 kHz and output power that trumps other bachelor models. On the other end of the spectrum is a shaker manufactured by AuraSound. The Pro Bass Shaker offers less in terms of dynamic functioning, but delivers more plenty milkshake to get in piece of cake to recommend.
The Budget Choice: Pro Bass Shaker
AuroSound's Pro Bass Shaker is marketed for a range of applications, including video game cabs, cars, and theater seating. It can exist readily purchased from Parts Express and Amazon for less than $50 (sale prices dip every bit depression every bit $35 per unit). With a power rating of fifty Watts (4 ohms), the Pro Bass Shaker might be weaker than other options, simply it'southward cheap enough to buy in multiples to increase impactful ability. It has a usable frequency response of twenty Hz to 80 Hz and uses an internal vocalisation coil to evangelize xxx lbs. of max strength. Due to its reasonable size (half dozen.2-inches broad, 2.5-inches tall), it'southward easy to identify within piece of furniture. From my perspective the Pro Bass Shaker's express frequency response is far from a handicap. While some users might appreciate a more than expensive model's ability to create a tactile response from higher frequency data, I've found that any kind of vibration resulting from data above 50 Hz begins to intrude into the realm of dialog; it's a scrap odd when the depression-end of throaty voices finds its fashion into your chair.
Powering the Evidence
You need to recollect of shakers as small subwoofers that crave outboard distension. In other words, you need to feed them power. Quite a few premium brands (such equally Buttkicker) sell packaged systems that send with a dedicated amplifier unit. However, if y'all're going the exercise-it-yourself route, you'll demand to go creative. Options include using a subwoofer plate amp (e.g., Dayton Sound'southward SA70 70 Watt Subwoofer Plate Amplifier), an old AV receiver or amplifier, or a new receiver or amp. During my install, I reached for a used Pioneer Elite VSX-21 THX receiver I had on my demote. An AVR has several advantages, including an independent book knob that allows yous to easily vary output intensity. Any your pick, if you go the AuraSound route, you won't need to source a tremendous amount of power to become great effect. Anything capable of producing 70 Watts or more per channel should get the job done.
Installation
My theater seating consists of a modular couch organisation that has 3 big seating surfaces. I opted to buy two Pro Bass Shakers per seating section of the couch; feel tells me that I'd all the same dedicate two shakers per seat if I were outfitting chairs with smaller seating surfaces.
In addition to a ability source and shaker units, yous'll need:
– (1) ii Female to ane Male person Y-Adapter (RCA Splitter)
– (I) RCA or subwoofer cable
– Speaker Wire (considered 4-in-1 bundled wire if you are installing more than than one shaker)
– (One) 50 Hz Inline Low Pass RCA Filter
– Wood Screws
– Rubber Anxiety or Isolators for your couch or chairs
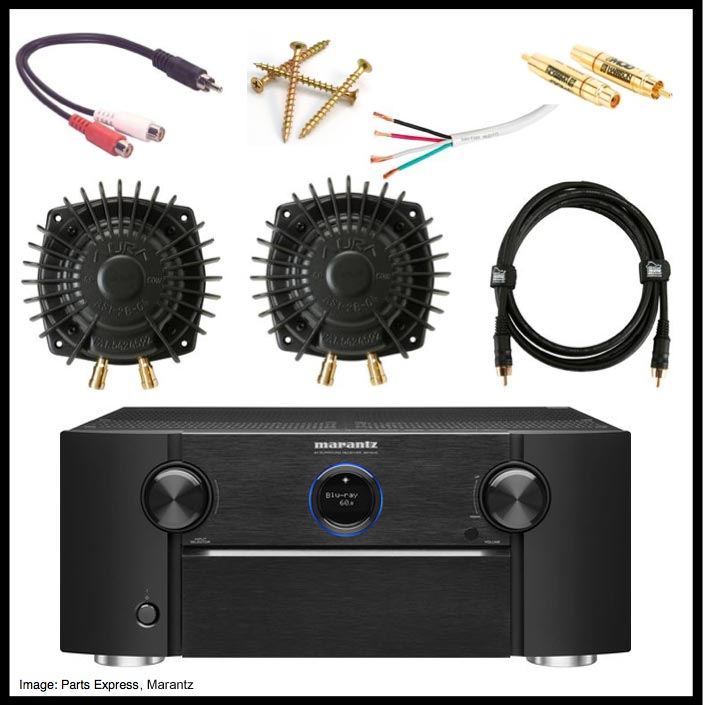
Yous can find near of these parts at a supplier such as Parts Limited. Installation might vary based on the kind of receiver or amplifier you use, only the following are general guidelines that should apply to most applications.
Step one: Split the Subwoofer Output
In club to dissever the low frequency signal, plug the RCA Y-Adapter into your primary AV Receiver'due south Subwoofer Out. Plug the subwoofer's cable into ane side of the splitter and the new RCA cablevision into the other. Insert the 50 Hz Depression Laissez passer Filter into the "Subwoofer In" input on your bass shaker'south amp and plug the new RCA cable into the filter.
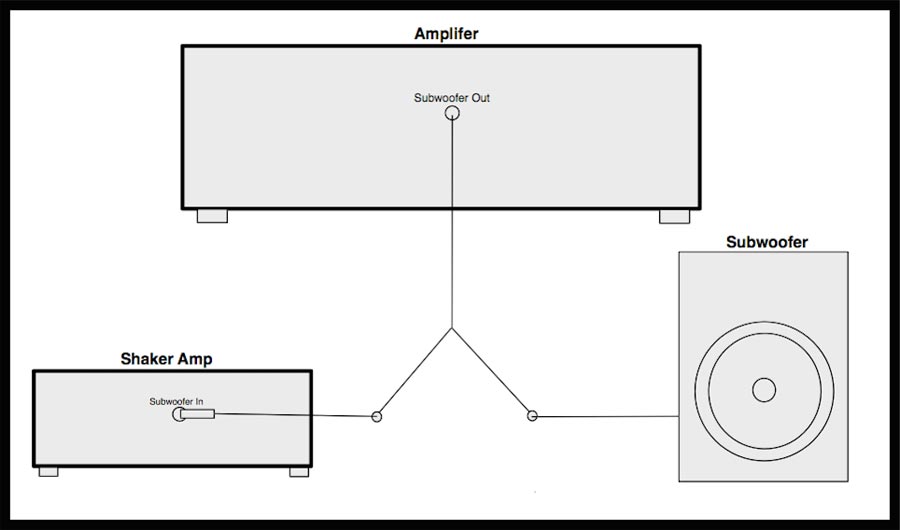
If you're using a plate amp, then yous might need a second splitter to connect the LFE cablevision to the left and right low-level inputs on the plate amp. In this case, put the low laissez passer filter in-between the RCA cable and the second splitter.
Step 2: Install Bass Shakers
In guild to install the Pro Bass Shakers, y'all'll need to gain access to the underside of the your seating. The shakers demand to be firmly mounted using all four-screw holes nowadays on the housing of the shaker, with the bottom-side facing upward into the seating surface. This is a key bespeak of emphasis: If you want the near tactile response, then mount the shakers facing in the "bottom side up" position. If your couch or chair has bracing or a solid surface that allows for this orientation, great. If not, so yous'll need to cut and install a bridge-lath fabricated from solid wood or plywood. Simply spiral the bridge-lath into the bottom of your chair and mount the shaker on the board. My installation required the latter, and was easily achieved with a few quick cuts and several strategically placed screws to agree it into place.
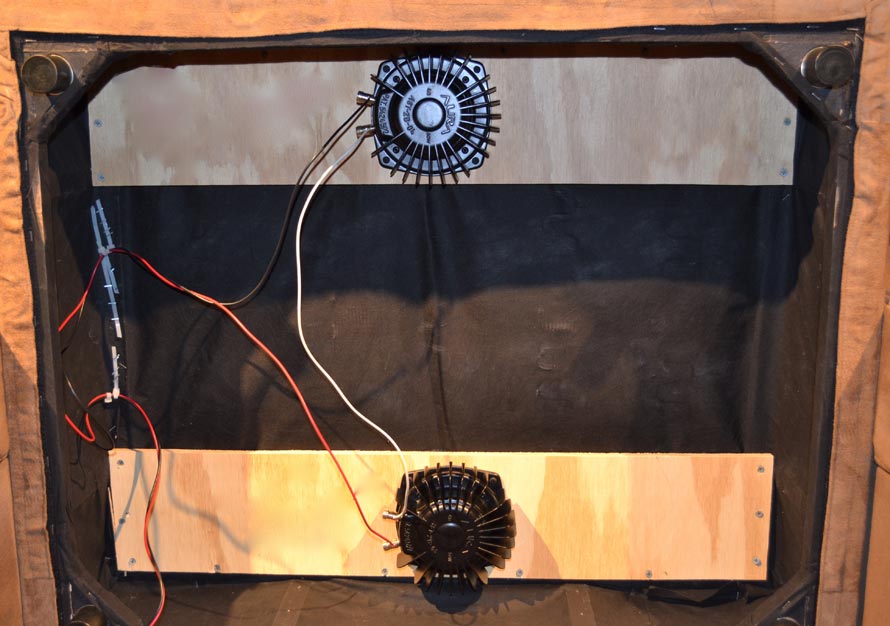
Once the shakers have been installed, brand certain that all screws (on the bridge-boards and shakers) are tight.
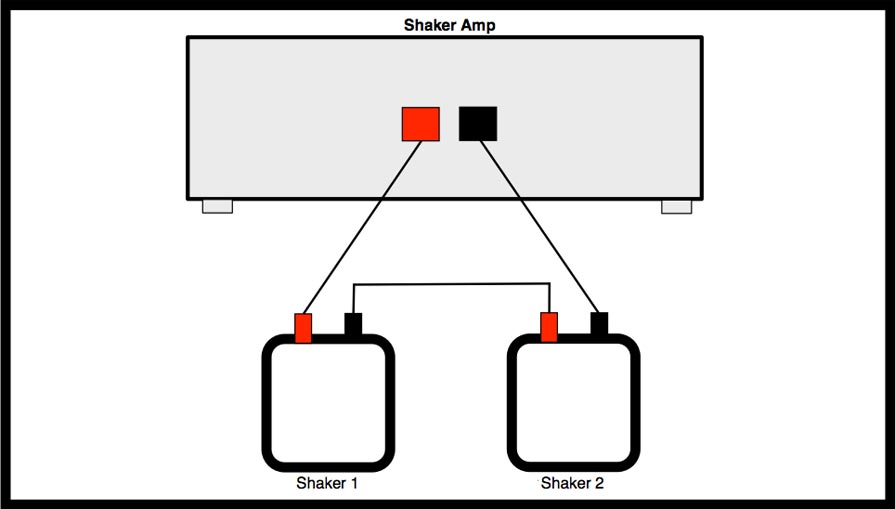
Stride 3: Wire for Ability
Pro Bass Shakers have an impedance of 4 ohms, therefore you're all-time option is to wire them in series (if installing in pairs), which creates an 8 ohm load that nearly amps tin easily handle. For a single bass shaker, simply run speaker wire from the positive terminal of the amp to the positive terminal on the shaker (and negative to negative). For ii bass shakers, connect the positive of i bass shaker to the negative of the other bass shaker. Next, connect the unused positive and negative terminals on the bass shakers to the respective positive and negative terminals on the amplifier. Repeat this process for the other bass shaker pairings, only connecting one speaker wire to each final on the backside of your amp.

Fix for Action
Once the shakers are installed, y'all're ready for action. Definitely consider decoupling your couch or chair from the floor using safe anxiety or another type of isolation production. Proper isolation will help to keep the shake in your seat as opposed to dispersing it into the flooring. You lot'll need to experiment with book output on your shaker amp if using an AVR (you might notice that too much volume will crusade your AVR to trip and plough off during heavy bass playback). Bated from that, sit back and savour the rumble!

Source: https://hometoys.com/how-to-install-bass-shakers-in-your-home-theater/
Posted by: littletonfliptatheaus41.blogspot.com
0 Response to "How To Install Bass Shakers In Car"
Post a Comment